Table of Contents
Resistance
Resistance is the property of a material by virtue of which it opposes the flow of electrons through the material. Thus resistance restricts the flow of electric current through the material. The unit of resistance (R) being “ohm” (Ω).
The resistor is the simplest and also the most fundamental of all electronic components. It is designed to have a constant resistance across all frequencies and under all normal circuit conditions (within reason). Resistors limit the amount of current flowing through them and they drop voltage across their terminals. Voltage drop is the term used to talk about the difference in voltage between two points in a circuit, also commonly referred to as the potential difference between the two points.
Resistors come in many shapes and sizes, but the most common format used for handmade electronics is the little dumbbell with colored stripes on its body and leads sticking out from either end as in the image in Figure (a) shown below. These are called through-hole resistors and they are designed to be used by bending the legs, inserting them through holes in a circuit board, and then soldering them in place on the boards reverse side.

For comparison, the above figure (b) shows the kind of resistor typically used in modern machine assembled circuits. These resistors look like small chips of black plastic and are called surface mount devices or SMDs. They come in different sizes but tend to be very much smaller than typical through-hole resistors. The number indicates on its surface, the value of the resistor in ohms. The first two digits are the start of the number and the third digit tells how many zeros to add.
Resistor Symbols
Two different symbols are commonly used to represent resistors when drawing circuit diagrams. The convention of a rectangle is used exclusively as in Figure (a) shown below. The zigzag symbol in Figure (b) is used widely elsewhere and indeed both are encountered regularly. There is no difference between the meanings of these two alternate forms of the resistor circuit symbol.

Resistor Colour Codes
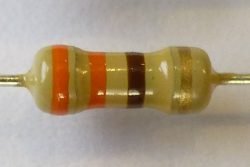
The coloured stripes on a standard through hole resistor tell two things: the resistance value and the manufacturing tolerance. It is not necessary to remember the colour codes, they can always be looked up as and when they are needed. It is however useful to know how to interpret them. The code on a standard resistor will consist of either four or five coloured stripes. The colours can be interpreted using Table given below.
| Colour | Digit | Multiplier | Tolerance |
| Black | 0 | ×1 | – |
| Brown | 1 | ×10 | ±1% |
| Red | 2 | ×100 | ±2% |
| Orange | 3 | ×1000 or ×1k | ±3% |
| Yellow | 4 | ×10k | ±4% |
| Green | 5 | ×100k | ±0.50% |
| Blue | 6 | ×1M | ±0.25% |
| Violet | 7 | ×10M | ±0.10% |
| Grey | 8 | ×100M | ±0.05% |
| White | 9 | ×1G | – |
| Gold | – | ×0.1 | ±5% |
| Silver | – | ×0.01 | ±10% |
| None | – | – | ±20% |
The last two stripes always have the same meaning – the second last stripe is the multiplier and the last stripe is the tolerance. This leaves either two or three colours which get turned into the first two or three digits of the value.
The four colour code would be: Red, Red, Brown, Gold, while the five band code would be: Red, Red, Black, Black, Gold. However it is worth noting that a five band code is more likely to be found on a ±1% tolerance resistor, so the last stripe would be brown instead of gold.
In theory, there should be a slightly wider gap between the last two stripes so that it is possible to tell which way round to read the code but in practice, it is often difficult to differentiate this larger space.
Power Rating of Resistance
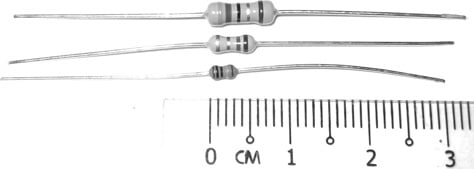
As with all components, when current flows through a resistor it heats up. The power rating indicates how much heat it can dissipate before it runs the risk of being damaged. Standard resistors can usually handle between about 125mW and 0.6W of power safely. The power ratings of standard through-hole resistors are relatively modest. The three components shown in the figure below have, going from top to bottom, power ratings of 600mW, 250mW, and 125mW. The smallest of the three, at barely 3.5mm long, is a slightly less common format, and the upper two exemplify by far the most usual range of through hole resistors encountered.

For higher dissipations, physically bigger components are needed, possibly with integrated heat sinks to help get rid of excess heat. The figure below shows examples of three types of power resistors with different power ratings.
Series Rule and Parallel Rule
When analysing circuits it is often necessary to work out the total resistance of a number of resistors wired in various configurations. Even the most complex resistor network can be reduced to a single resistance value through the successive combination of pairs of resistors wired either in series or in parallel.
Two simple rules are used to achieve this, usually referred to as the resistor series and parallel rules. What these two rules are saying is that the two resistors in series or parallel could be replaced by a single resistor whose value is given by the appropriate rule without changing the operation of the circuit.
Series Rule
The series rule for resistors just says that the combined resistance of two resistors wired one after the other or in series is the sum of the two individual resistor values.

The two resistors must be directly connected at one end and must not be directly connected at their other ends (or they would be in parallel). It also must be the case that there are no other connections into the point where the two resistors join. If these conditions hold then the two resistors may be replaced by a single resistor without altering the operation of the circuit.
R_{series}=R_{1}+R_{2}Parallel Rule
The parallel rule allows a combined value to be calculated for two resistors wired up side by side as shown in figure below.

There is another formulation of the parallel rule which allows for the combination of more than two resistors in parallel simultaneously but there is no need to confuse the issue by introducing that equation here.
R_{parallel}=\frac{R_{1}*R_{2}}{R_{1}+R_{2}}Voltage Divider Rule (VDR)
The next step in the simple analysis of resistor circuits involves calculating the voltage which will appear at the midpoint of two resistors in series given the voltages at either end. This question can be considered in two parts. First the more straightforward case is examined where the voltage at one end equals zero volts, with an arbitrary voltage applied to the other end. This is then generalised to the case where arbitrary voltages may appear at both ends.

The circuit for the first case is shown in above Figure. With the voltage Vin applied at the top of R1, and the bottom of R2 connected to ground (zero volts). The voltage Vout which will appear at the junction of R1 and R2 is given as.
V_{out}=V_{in}*\frac{R_{2}}{R_{1}+R_{2}}
An obvious generalisation of this arrangement is when the voltage at the bottom of R2 is not zero, in which case the calculation becomes just slightly more complicated. This variation is shown in above Figure, and the modified calculation is given as.
V_{out}=(V_{a}-V_{b})*\frac{R_{2}}{R_{1}+R_{2}}+V_{b}Variable Resistors
Variable resistors are extremely useful. They consist of a strip of resistive material with a terminal attached at each end of the strip, and a third terminal attached to a moving contact which connects to the strip. This contact can be positioned and repositioned at different locations along the strip to provide a continuously variable resistance between the third terminal and each of the two end terminals.

Variable resistors come in many shapes and sizes. Above Figure shows some examples:
- a) is what is called a potentiometer or pot, and is the kind of device which might be found under a volume control for instance,
- b) is called a fader or linear fader, because it is moved in a straight line instead of rotating as in a pot,
- c) is variously referred to as a preset, trimmer, or trim pot,
and while a) and b) usually provide user controls, presets are used for calibration of a circuit. They are usually intended to be adjusted when the circuit is first built and then left alone unless a recalibration of the circuit is ever required.

There are a number of variations on the circuit symbols which may be used in drawing variable resistors in circuit diagrams. Above Figure shows four possibilities, two for pots and faders, and two for trimmers, although the first pair will quite often be used when a trimmer is intended in a circuit.


